Table of Contents
Accessing the Webots Simulator in the SmartMDSD Toolchain
This advanced tutorial describes how to use the SmartMDSD Toolchain together with the Webots simulator. It describes the use of an external controller in a SmartMDSD component and how to include it in webots.
Warning! This is outdated and needs an update. Meanwhile, we have a consolidated and standard way to implement SmartSoft components that interact with Webots. You can have a look at the source code of these components. We will soon provide updated information here.
Basic Information
| Level | Experienced |
|---|---|
| Role | Component Supplier |
| Assumptions | Good understanding of component development and the SmartMDSD Toolchain |
| System Requirements | Installed webots simulator https://cyberbotics.com/download as described in https://cyberbotics.com/doc/guide/installing-webots |
| You will learn | How to establish communication between SmartSoft toolchain and Webots Simulator, send commands to and receive sensor values from Webots Simulator |
Description
In this tutorial you will learn:
- How to start Webots Simulator during deployment of a SmartSoft System.
- How to connect a task from SmartSoft Component as an external controller to Webots Simulator.
- How to operate a robot inside Webots Simulator from SmartSoft Component.
Starting Webots Simulator Environment from SmartSoft Component
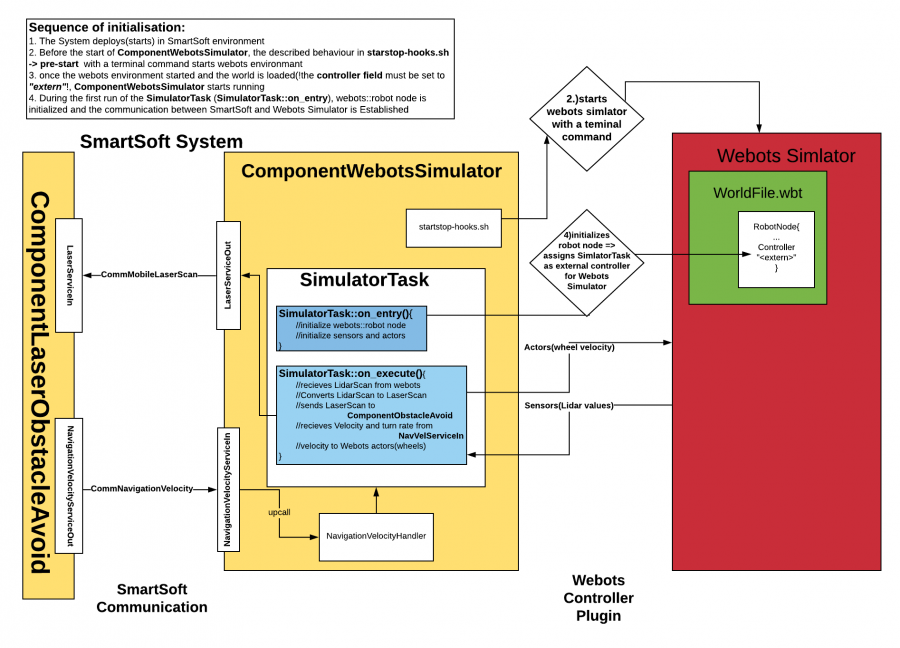
ComponentWebotsSimulator simulates a robot in a 3D environment using free open source Webots Simulator provided by https://cyberbotics.com/. The image below provides a visualization of system architecture and connection with Webots environment.
First, you need to create a world in Webots Environment. To create a world follow Hands-on #1 to #5 as described by the link below, only in Hands-on #5 instead of e-puck robot add Pioneer 3-DX. https://www.cyberbotics.com/doc/guide/tutorial-1-your-first-simulation-in-webots
Now you need to convert Pioneer 3-DX to a base node. To do this right-click on Pioneer3dx in the Scene Tree and select Convert to Base Node(s) option.
Now all you need to do is set the controller to <extern>. Double-click on the Robot node in the scene tree. Select controller field. In the bottom screen click Select…. Choose <extern>.
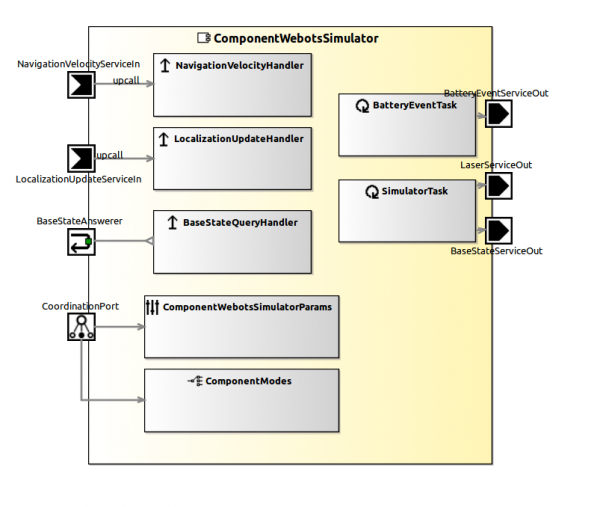
Next, we need to implement ComponentWebotsSimulator. The image below provides the architecture of ComponentWebotsSimulator. It is not necessary to build all these tasks, but building it this way, allows later to extend functionality for Pioneer 3-DX Simulation.
Now it`s time to connect ComponentWebotsSimulator task to Webots Simulator as an external controller. If you want to know more about the work of the controller plugin read the information at https://www.cyberbotics.com/doc/guide/controller-plugin. This tutorial shows the steps to make it work, such as create a *.wbt file with a robot node, set controller field to “extern”, connect Webots Library in CmakeLists.txt of your external controller, initialize webot nodes inside the external controller, pass commands to webots simulator
Once you`ve created ComponentWebotsSimulator, open ComponentWebotsSimulator/smartsoft/src/startstop-hooks.sh and add the following lines to start the Webots Simulator during system deployment
pre-start)
    echo "Triggering pre-start hooks FROM COMPONENT ComponentWebotsSimulator ..."
    # Insert commands you want to call before starting the components
        echo -e "\n\n\n"
    # start script to start webots env;  location of world file(*.wbt)
bash $WEBOTS_HOME/webots ~/PathToMap/src/webot_projects/PioneerLMS291/worlds/empty1.wbt &

echo "Wait for Simulator to start..."
sleep 6
;;
To be able to compile controller code we need to add a few lines to smartsoft/CMakeLists.txt
#around line 40
link_directories($ENV{WEBOTS_HOME}/lib)

set(WEBOTS ${CMAKE_SHARED_LIBRARY_PREFIX}Controller${CMAKE_SHARED_LIBRARY_SUFFIX} ${CMAKE_SHARED_LIBRARY_PREFIX}CppController${CMAKE_SHARED_LIBRARY_SUFFIX})

#    ...

#around line 50
INCLUDE_DIRECTORIES(
  ${CMAKE_CURRENT_LIST_DIR}/src
  ${CMAKE_CURRENT_LIST_DIR}/src-gen
  ${CMAKE_CURRENT_LIST_DIR}/src-gen/params
  $ENV{WEBOTS_HOME}/include/controller/c
  $ENV{WEBOTS_HOME}/include/controller/cpp
  $ENV{WEBOTS_HOME}/lib
)

#    ...

#around line 60
FILE(GLOB CPP_SOURCES *.cc)
set(SOURCES ${CPP_SOURCES})

#    ...

#around line 70
ADD_EXECUTABLE(${PROJECT_NAME} ${SRC} ${SRC_GEN} ${SRC_GEN_PARAMS} ${FURTHER_SRCS} ${SOURCES}) # add ${USER_SRC} (if needed)
TARGET_LINK_LIBRARIES(${PROJECT_NAME} ${WEBOTS})
TARGET_LINK_LIBRARIES(${PROJECT_NAME} /PathTo/webots/lib/libController.so)
TARGET_LINK_LIBRARIES(${PROJECT_NAME} /PathTo/webots/lib/libCppController.so)
Now we are ready to write our controller inside SmartMDSD toolchain
Writing Controller inside SmartMDSD Toolchain
First, we need to check if everything was set Properly and the connection between
in SimulatorTask.hh
#ifndef _SIMULATORTASK_HH
#define _SIMULATORTASK_HH

#include "SimulatorTaskCore.hh"
//add libraries
#include <webots/Motor.hpp>
#include <webots/Robot.hpp>

#define TIME_STEP 64

class SimulatorTask  : public SimulatorTaskCore
{
private:
    webots::Robot *robot_motor;

    webots::Motor *rightMotor;
    webots::Motor *leftMotor;
public:
    unsigned long scan_count;
    //default public variables
    // ...
};

#endif
in SimulatorTask.cc
int SimulatorTask::on_entry()
{
      robot_motor = new webots::Robot();

      // sets up wheels
      leftMotor = robot_motor->getMotor("left wheel"); //make sure that the name is the same as in *.wbt(world file)
      rightMotor = robot_motor->getMotor("right wheel");

      leftMotor->setPosition(INFINITY);
      rightMotor->setPosition(INFINITY);

      leftMotor->setVelocity(0);
      rightMotor->setVelocity(0);

      return 0;
}


int SimulatorTask::on_execute()
{
    if (robot_motor->step(TIME_STEP) != -1) {

            leftMotor->setVelocity(1.5);
            rightMotor->setVelocity(1.5);
    }
    return 0;
}


int SimulatorTask::on_exit()
{
     delete robot_motor;
    // use this method to clean-up resources which are initialized in on_entry() and needs to be freed before the on_execute() can be called again
    return 0;
}
Now Build the Component, create a 1-component System and Deploy it. If during deployment you see the movement of the Robot - you have correctly accessed the Webots Simulator in the SmartMDSD Toolchain.


