Table of Contents
SmartMDSD and GoPiGo Hardware
Setting up GoPiGo Hardware
We provide tutorials to learn applying and using the SmartMDSD Toolchain for GoPiGo3 Robot. We recommend to go through the material in the listed order. Some basic tutorials are referred for details.
In addition, note our list of HowTo's that provide very precise and short descriptions of a specific task in the SmartMDSD Toolchain.
In this lesson one, we guide you through first examples of running SmartMDSD on GoPiGo3 Robot. GoPiGo3 Kit comes with basic hardware and components, few sensors would need to order seperately. Please follow the GoPiGo3 Site description for Assembly of GoPiGo3 :
Setting up GoPiGo with Operating System
As you would coding the GoPiGo3, you would be needing Raspbian for Robots And setup instructions can be found at :
A mentioned link has the link for step by step installation of the Operating System.
https://www.dexterindustries.com/howto/install-raspbian-for-robots-image-on-an-sd-card/
The link for Operating system image (summarizing again)( Sourceforge ) :
https://sourceforge.net/projects/dexterindustriesraspbianflavor/
As per the given instruction, you will need to install Etcher to burn the image on the SD card.
Setting up GoPiGo with SmartSOFT Toolchain SmartMDSD
Expectation : you have Operating System image flashed on SD card and You have inserted the SD card in Raspberry pi.
Follow the Tutorial for installing SmartMDSD Toolchain As GoPiGo3 is using Raspberry pi, installation is identical.
- Working with the Raspberry Pi: Installation
This tutorial provides Raspberry Pi specific installation instructions and general remarks to work with the SmartMDSD Toolchain and the Raspberry Pi.
Creating your first Component
clone the repository on the computer :
git clone pi@10.36.32.131:/home/pi/SOFTWARE/MyBackups
OR clone the repository on the computer :
git clone XYXYXY/home/pi/SOFTWARE/MyBackups
Either you can create a repository on Gopigo and clone it on your computer OR You can create a repository on Computer and clone it on Gopigo
Create a repository on Gopigo itself which would help in sharing and Compiling of Components
git init --bare --shared=group
git add .
git commit -m "msg"
git push
Testing Simple GoPiGo System
Home/SOFTWARE/smartsoft/
./startSmartSoftNamingService
Home/SOFTWARE/GoPiGo_repository/ComponentGoPiGoBase/smartsoft/build
rm -rf *
cmake ..
make
./ComponentGoPiGoBase
If GoPiGo3 is moving, You are ready add your own customized code in Components.
Testing Simple GoPiGo System with Emergency Avoidance
Home/SOFTWARE/smartsoft/
./startSmartSoftNamingService
Home/SOFTWARE/GoPiGo_repository/ComponentGoPiGoBase/smartsoft/build
rm -rf *
cmake ..
make
./ComponentGoPiGoBase
Introducing Navigation for the GoPiGo System with Emergency Avoidance
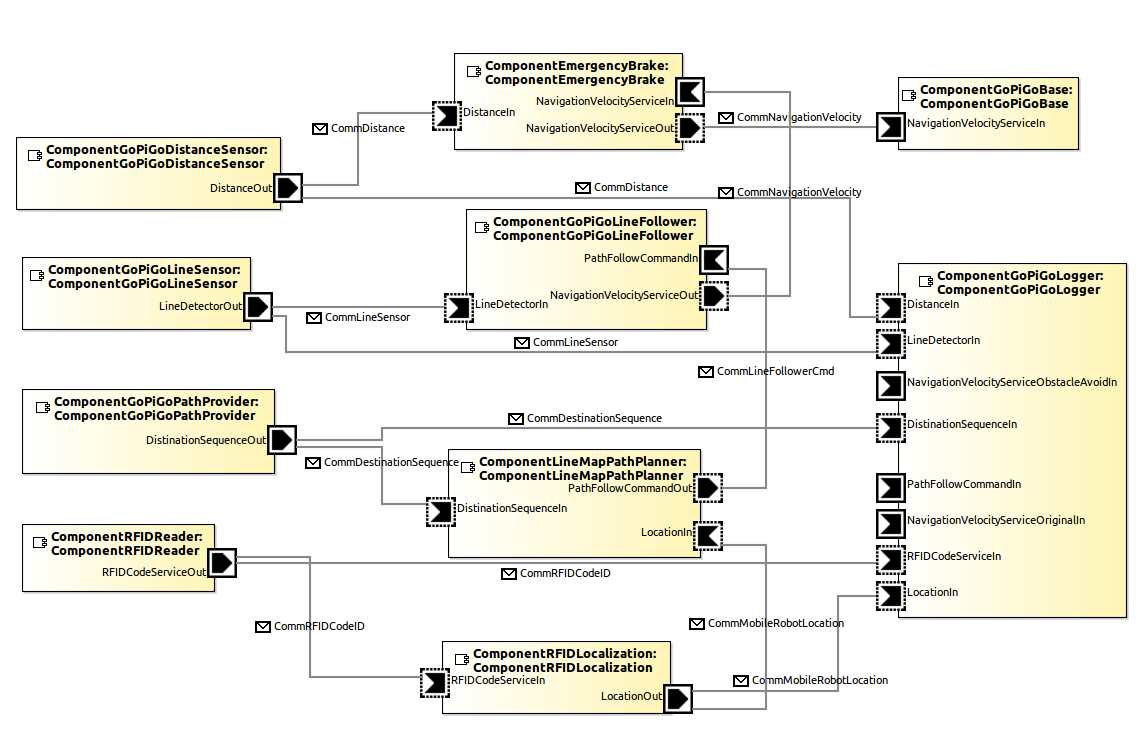
Testing the whole System Architecture
Setps to prepare a System
- Open MDSD-toolchain on Computer System.
- Then import all the necessary Domain Models and Components.
- Compile Domain Models : DomainSimpleRobotics, CommBasicObjects, CommNavigationObjects
- Model the SystemArchitecture with all above mentioned components as showing the figure.
- Model the Target platform as shown in the figure.
- Model the Deployment as shown in the figure.
- Compile Component Models :
- ComponentEmergencyBrake - Crash avoidance
- ComponentGoPiGoBase - GoPiGo3 Base movement.
- ComponentGoPiGoDistanceSensor - Distance Sensor for collision
- ComponentGoPiGoLineFollower - Line Follow Algorithm
- ComponentGoPiGoCmdConsole - User Decision on Decision Circle
- ComponentGoPiGoLineSensor - IR sensor for Line Detection
- ComponentLineMapPathPlanner - Path planning for mobility as per Task
- ComponentRFIDLocalization - Localization using RFID tags and Json
- ComponentRFIDReader - RFID reader
Deploying on GoPiGo3
- Binaries created by Component compilation on computer system, do not work on GoPiGo3/Raspberrypi.
- So, we need these component projects on GoPiGo3 and we compile it again on GoPiGo.
- But, we can not install the tool chain on GoPiGo due to compatibility and performance reasons.
- Thus Development of Component on Computer and Compilation and Execution on GoPiGo is required.
Compiling on Gopigo
External Library Dependencies : Gopigo.h - according to version GoPiGo.h can be included.
https://github.com/DexterInd/GoPiGo3
git clone https://github.com/DexterInd/GoPiGo3
I have used following commands to enable disable the usb RFID (this will prevent the printing of RFID tag on console)
$ xinput --list | grep -- "Barcode" | grep -oP 'id[^[:blank:]]*' | sed 's/[^0-9]*//g'
$ xinput set-int-prop 6 "Device Enabled" 8 0
- Compile all components one by one on GoPiGo :
rm -rf *
cmake ..
make
- Copy the binary to the System in /tmp folder.
- [Optinal] It is possible to copy deployment to user folder, as /tmp system gets deleted on restart.
- Copy NamingService folder inside deployment by local files : /smartsoft/NamingService
Steps to Run the Deployment
- Develop a System with required Components and Services and deploy it on GoPiGo.
- Browse to the deployed folder on GoPiGo (/tmp)
- Copy all Domain Projects, Component projects to GoPiGo and Compile.
- Copy all binaries and Namingservice folder to /tmp
- run the deployment
- bash start-pc1 start
But do not start the run.
Once you compile the Domain Models and Components, you would need to copy the binaries.

