Table of Contents
SmartMDSD and GoPiGo using Webots simulator
Basic Information
| Level | Experienced |
|---|---|
| Role | Component Supplier, System Builder |
| Assumptions | Successfully finished Accessing the Webots Simulator in the SmartMDSD Toolchain and https://cyberbotics.com/doc/guide/tutorial-6-4-wheels-robot |
| System Requirements | Installed webots simulator https://cyberbotics.com/download as described in https://cyberbotics.com/doc/guide/installing-webots |
| You will learn | How to replace Hardware Interface Components with Simulation Interface Components and reuse Internal Logic Components, without detailed examination of their implementation |
Description
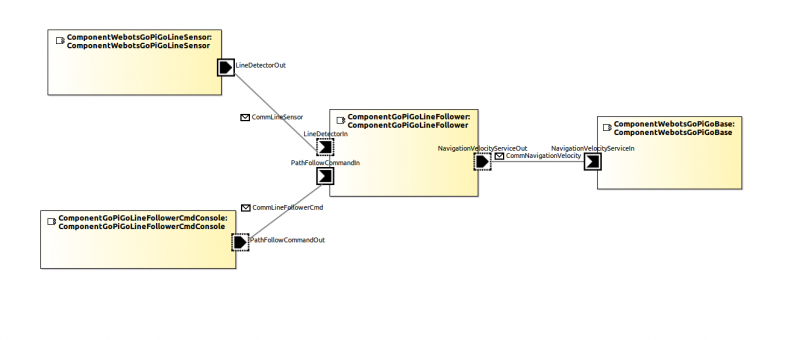
By the end of this tutorial, you will build 2 Simulation Interface Components for Webots Simulator and create a simple System that reuses 2 Components from SmartMDSD and GoPiGo Hardware .
In this tutorial you will learn:
- How to control a single robot in Webots Simulator with multiple Controller Components
- How to reuse components for real robots in a simulation
In the first part of the tutorial, you will learn how to set up a world on the Webots Simulator side and run multiple external controllers on a single robot. The second part of the tutorial shows how to set up multiple Interface Controllers with SmartSoft approach and integrate the System into Webots Simulator R2019b.
Webots Simulator world creation for communication with multiple controllers
If you wish to move on directly to controller development you may download the world from ««here_link»». Written and tested in Webots Simulator R2019b on ubuntu 16.04.01 LTS.
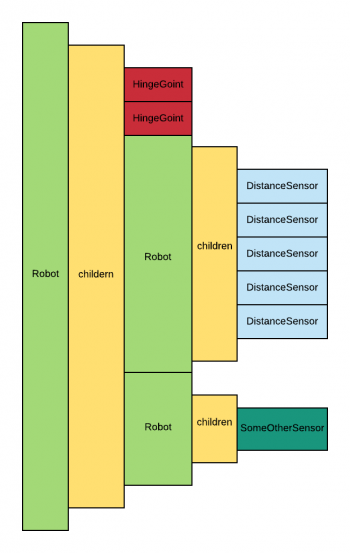
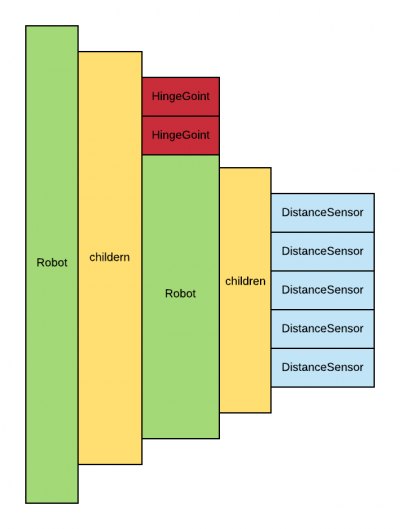
To be able to access sensors and actors in Webots Simulator from different components, you need to encapsulate sensors/actors inside the robot for each interface component.
Robot {  # this is the root robot which has only motors
  controller "extern"
  children [
     # joint + motor 1
     # joint + motor 2
     Robot {  # This robot contains distance sensors and is embedded in the first one
       children [
         DistanceSensor {}
         DistanceSensor {}
         DistanceSensor {}
         DistanceSensor {}
         DistanceSensor {}
       ]
      controller "extern"
    }
    Robot {  # This robot contains only the GPS and is embedded in the first one
       children [
         GPS {} # for example
       ]
      controller "extern"
    }
  ]
}
To sum up:
1. Encapsulate robot nodes inside the main Robot
2. Set the controller field in each robot to <extern>
In this tutorial, we will make a simple robot as is shown below. If you experience difficulties look trough https://cyberbotics.com/doc/guide/tutorial-6-4-wheels-robot.
If you want to skip this part or see an example of such implementation you can download the world file from <lin_to_download_GoPiGo3_LineFollowerOneSensor>, copy it to your projects world directory and open it in Webots Simulator.
External Controllers
 Now, that we have prepared the world, it`s time to implement controllers.
First create a project directory with your controller code, CMakeLists.txt and build directory for each controller. Copy the code below into CMakeLists.txt.
cmake_minimum_required(VERSION 3.0)

get_filename_component(PROJECT_NAME ${CMAKE_SOURCE_DIR} NAME)  # controller directory name

project(${PROJECT_NAME})

link_directories($ENV{WEBOTS_HOME}/lib)

file(GLOB CPP_SOURCES *.cpp)
set(SOURCES ${CPP_SOURCES})

set (LIBRARIES ${CMAKE_SHARED_LIBRARY_PREFIX}Controller${CMAKE_SHARED_LIBRARY_SUFFIX} ${CMAKE_SHARED_LIBRARY_PREFIX}CppController${CMAKE_SHARED_LIBRARY_SUFFIX})

include_directories($ENV{WEBOTS_HOME}/include/controller/c $ENV{WEBOTS_HOME}/include/controller/cpp)

add_executable(${PROJECT_NAME} ${SOURCES})

target_link_libraries(${PROJECT_NAME} ${LIBRARIES})
And the code below into your controller file.
#include <webots/Motor.hpp>
#include <webots/Robot.hpp>
using namespace webots;
#define MAX_SPEED 1
#define TIME_STEP 64
int main(int argc, char **argv) {
  // create the Robot instance.
  Robot *robot_motor = new Robot();
  // sets up wheels
  Motor *leftMotor = robot_motor->getMotor("leftWheel");
  Motor *rightMotor = robot_motor->getMotor("rightWheel");
  leftMotor->setPosition(INFINITY);
  rightMotor->setPosition(INFINITY);
  leftMotor->setVelocity(0.0);
  rightMotor->setVelocity(0.0);

  double leftSpeed  = 0.5 * MAX_SPEED;
  double rightSpeed = 0.5 * MAX_SPEED;

  while (robot_motor->step(TIME_STEP) != -1) {

    leftMotor->setVelocity(leftSpeed);
    rightMotor->setVelocity(rightSpeed);
}
  delete robot_motor;
  return 0;
}
Then do the same for DistanceSensor controller.
#include <webots/DistanceSensor.hpp>
#include <webots/Robot.hpp>
using namespace webots;
#define TIME_STEP 64
int main(int argc, char **argv) {
  // create the Robot instance.
  Robot *robot_ir =new Robot();
  DistanceSensor *ir0 = robot_ir->getDistanceSensor("ps0");
  DistanceSensor *ir1 = robot_ir->getDistanceSensor("ps1");
  DistanceSensor *ir2 = robot_ir->getDistanceSensor("ps2");
  DistanceSensor *ir3 = robot_ir->getDistanceSensor("ps3");
  DistanceSensor *ir4 = robot_ir->getDistanceSensor("ps4");

  ir0->enable(TIME_STEP);
  ir1->enable(TIME_STEP);
  ir2->enable(TIME_STEP);
  ir3->enable(TIME_STEP);
  ir4->enable(TIME_STEP);

  while (robot_ir->step(TIME_STEP) != -1) {
   std::cout << " l0 = " << ir0->getValue() << ";    l1 = "
      << ir1->getValue() << ";    l2 = " << ir2->getValue()  << ";    l3 = "  << ir3->getValue()  << ";    l4 = " << ir4->getValue() << std::endl;
 }
  delete robot_ir;
  return 0;
}
Now build both controllers by executing the following commands in their build directories.
cmake ..
make
Once you`re done, open the world in Webots Simulator (make sure both controllers are set to '<extern>') and run your controllers. Remember the sequence in which you run your controllers, since in some cases this may cause a segmentation fault. This issue is relevant to Webots R2019b.
Additional Materials for this section:
https://cyberbotics.com/doc/guide/tutorial-4-more-about-controllers
https://cyberbotics.com/doc/guide/tutorial-5-compound-solid-and-physics-attributes
https://cyberbotics.com/doc/guide/tutorial-6-4-wheels-robot
https://cyberbotics.com/doc/reference/distancesensor
https://cyberbotics.com/doc/reference/motor
https://cyberbotics.com/doc/reference/hingejoint
Implement Components
In this system we need to create only ComponentWebotsGoPiGoBase and ComponentWebotsGoPiGoLineSensor, the other 2 components will be reused.
Since both ComponentWebotsSimulator from Accessing the Webots Simulator in the SmartMDSD Toolchain, and ComponentGoPiGoBase, both move the robot(one in real-world another in a simulation), in theory, we could replace ComponentGoPiGoBase with ComponentWebotsSimulator and make a few small adjustments for GoPiGo3 robot, but since in this System, we want to show another approach by creating a separate component for each sensor/actor of a robot for reusability next we will create ComponentWebotsGoPiGoBase.
ComponentWebotsGoPiGoBase
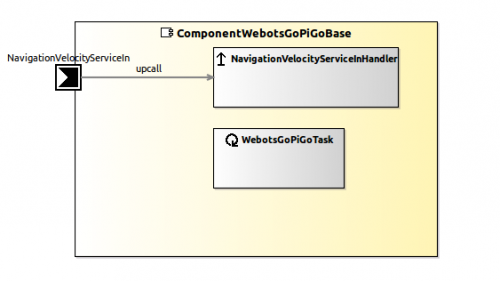
Create ComponentWebotsGoPiGoBase as shown below. Uses CommNavigationObjects Domain Model.
Add 2 public variables in ComponentWebotsGoPiGoBaseCore.hh
ComponentWebotsGoPiGoBaseCore.hh
public:
    ComponentWebotsGoPiGoBaseCore();
    double LeftSpeed;
    double RightSpeed;
};
In NavigationVelocityServiceInHandler.hh, add a few variables and methods. Just copy them from ComponentGoPiGoBase, since the logic here is pretty much the same, only you need to make some adjustments since GoPiGo3 robot and it`s simulation have different speed values.
NavigationVelocityServiceInHandler.hh
private:
    bool updateV, updateOmega, updateSonar;
    int newV, newOmega;

    int maxVel, maxRotVel;
public:
    void setV( int v );
    void setOmegaDeg( double omega );

    NavigationVelocityServiceInHandler(Smart::InputSubject<CommBasicObjects::CommNavigationVelocity> *subject, const int &prescaleFactor=1);
    virtual ~NavigationVelocityServiceInHandler();

    virtual void on_NavigationVelocityServiceIn(const CommBasicObjects::CommNavigationVelocity &input);

};
And add these lines to NavigationVelocityServiceInHandler.cc, which are also copied from ComponentGoPiGoBase, with minor adjustments at the end on the scale of speed and, the interface for sending them to the simulator instead of a robot.
NavigationVelocityServiceInHandler.cc
void NavigationVelocityServiceInHandler::on_NavigationVelocityServiceIn(const CommBasicObjects::CommNavigationVelocity &input)
{
    const double R = 32;//mm
    const double e = 50;//mm

    double v =  (double)(input.getVX());
    double w = input.get_omega();
    int maxspeed = 300;

    std::cout << "input.getVX() = v = " << v << std::endl;
    std::cout << "input.get_omega() = w = " << w << std::endl;

    double factor = 1.2;
    double speedreducer;

    speedreducer= factor- std::abs(w);
    speedreducer = speedreducer / factor;

    double c =  maxspeed  / 60.0;
    double ewc = e * w * c;

    v = v * speedreducer;

    double LeftWheelDPS  = (v  + ewc)/90; // devision by 90 was added after some tinkering

    std::cout << "LeftWheelDPS   = " << LeftWheelDPS << std::endl;

    double RightWheelDPS  = (v  - ewc)/90 ;  // devision by 90 was added after some tinkering

    std::cout << "RightWheelDPS   = " << RightWheelDPS << std::endl;
    COMP->LeftSpeed = LeftWheelDPS;    // send these values to the task responsible for interfacing Webots
    COMP->RightSpeed = RightWheelDPS;

}
void NavigationVelocityServiceInHandler::setOmegaDeg( double omega )
{
  if( omega > maxRotVel ) omega = maxRotVel;
  newOmega = (int)omega;
  updateOmega = true;
}

void NavigationVelocityServiceInHandler::setV( int v )
{
  if( v > this->maxVel ) v = this->maxVel;
  newV = v;
  updateV = true;
}
WebotsGoPiGoTask.hh
#include "WebotsGoPiGoTaskCore.hh"
#include <webots/Motor.hpp>
#include <webots/Robot.hpp>

#define TIME_STEP 64

class WebotsGoPiGoTask  : public WebotsGoPiGoTaskCore
{
private:
    SmartACE::SmartMutex mutex;
    webots::Robot *robot_motor;

    webots::Motor *rightMotor;
    webots::Motor *leftMotor;
public:
    WebotsGoPiGoTask(SmartACE::SmartComponent *comp);
    virtual ~WebotsGoPiGoTask();

    virtual int on_entry();
    virtual int on_execute();
    virtual int on_exit();
};
WebotsGoPiGoTask.cc
int WebotsGoPiGoTask::on_entry()
{

    robot_motor= new webots::Robot();

    leftMotor = robot_motor->getMotor("leftWheel");
    rightMotor = robot_motor->getMotor("rightWheel");

    leftMotor->setPosition(INFINITY);
    rightMotor->setPosition(INFINITY);

    leftMotor->setVelocity(0);
    rightMotor->setVelocity(0);

    return 0;
}
int WebotsGoPiGoTask::on_execute()
{

    if (robot_motor->step(TIME_STEP) != -1) // Necessary line for controller to Run when connecterd to Webots Simulator
     {
         mutex.acquire();
         int l =COMP->LeftSpeed;
         int r = COMP->RightSpeed;
         leftMotor->setVelocity(l);
         rightMotor->setVelocity(r);
         mutex.release();
     }
    return 0;
}
int WebotsGoPiGoTask::on_exit()
{
    delete robot_motor;
    return 0;
}
ComponentWebotsLineSensor
This component uses CommBasicObjects and DomainSimpleRobotics Domain Models.
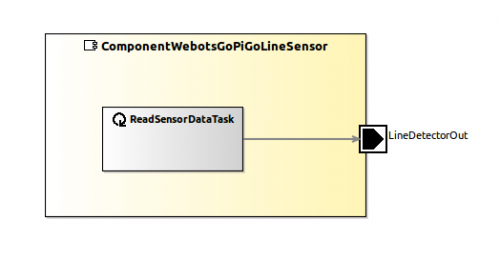
In ReadSensorDataTask.hh
#include <webots/Robot.hpp>
#include <webots/DistanceSensor.hpp>

#define TIME_STEP 64

class ReadSensorDataTask  : public ReadSensorDataTaskCore
{
private:
    webots::Robot *robot_ir;
    webots::DistanceSensor *ir0 ;
    webots::DistanceSensor *ir1 ;
    webots::DistanceSensor *ir2 ;
    webots::DistanceSensor *ir3 ;
    webots::DistanceSensor *ir4 ;
public:
    int sensor_length = 5 ;
    //default public variables
    // ..
};

#endif
In ReadSensorDataTask.cc
int ReadSensorDataTask::on_entry()
{
    robot_ir = new webots::Robot();
    ir0 = robot_ir->getDistanceSensor("ps0");
    ir1 = robot_ir->getDistanceSensor("ps1");
    ir2 = robot_ir->getDistanceSensor("ps2");
    ir3 = robot_ir->getDistanceSensor("ps3");
    ir4 = robot_ir->getDistanceSensor("ps4");

    ir0->enable(TIME_STEP);
    ir1->enable(TIME_STEP);
    ir2->enable(TIME_STEP);
    ir3->enable(TIME_STEP);
    ir4->enable(TIME_STEP);
    return 0;
}

int ReadSensorDataTask::on_execute()
{
    Smart::StatusCode status;
    std::cout << "CODE HERE " << std::endl;
    DomainSimpleRobotics::CommLineSensor CML;
    unsigned int read_val[5];
    if(robot_ir->step(TIME_STEP) !=-1){
        read_val[0] = ir0->getValue();
        read_val[1] = ir1->getValue();
        read_val[2] = ir2->getValue();
        read_val[3] = ir3->getValue();
        read_val[4] = ir4->getValue();
        std::cout << "ps0" << " = " << read_val[0] << " ;  "<< "ps1" << " = " << read_val[1] << " ;  "<< "ps2" << " = " << read_val[2] << " ;  "<< "ps3" << " = " << read_val[3] << " ;  "<< "ps4" << " = " << read_val[4] << " ;  "<<  std::endl;
    }

    std::vector<unsigned int> sensors(read_val, read_val+5);

    CML.setIs_valid(true);
    CML.setSensors(sensors);
    CML.setSensor_length(sensor_length);
    COMP -> lineDetectorOut -> put(CML);

    return 0;
}
int ReadSensorDataTask::on_exit()
{
    delete robot_ir;
    return 0;
}
Once you build components, all that's left to do is to create a System whose model was shown at the beginning of this tutorial. The only thing you need to keep in mind is the order of Controller start-up scripts. You may find this in SystemGoPiGoFollowTheLine/src-gen/deployment/start-PC1.sh and place them in a necessary sequence.
Do not forget to add into in startstop-hooks.sh a command to start the necessary world.
pre-start)
    echo "Triggering pre-start hooks FROM COMPONENT ComponentWebotsSimulator ..."
    # Insert commands you want to call before starting the components
        echo -e "\n\n\n"
    # start script to start webots env;  location of world file(*.wbt)
bash $WEBOTS_HOME/webots ~/PathToMap/src/webot_projects/PioneerLMS291/worlds/nameOfTheWorld.wbt &

echo "Wait for Simulator to start..."
sleep 6
;;

